Sunday, April 17, 2016

Tilt Out Trash

I didn't want to make this project, but our dog Cali, continually tries to help us by taking the trash out. 

Cali the overly ambitious boxer.

The problem is she has a hard time not ripping the bag with her teeth and getting trash all over the house. I can tell she tries to pick up the mess she's made because all of the trash has bite marks on it. I keep telling her we will handle taking out the trash but she doesn't listen and tries to surprise me with this task every time I leave the house. We tried blocking her from taking out the trash with chairs but her determination to help around the house is so strong, that she figured out how to move the chairs. We also tried putting the trash cans on the table but I'm not a huge fan of having trash cans on the table where I eat. She has tried helping us with the trash in the past, which resulted in her being confined to the laundry room when we went out. She could still enjoy the air conditioner in the laundry room and her doggie door was there so she could get outside as well. After the fourth of July last year when she developed an aversion to fireworks, she tried to chew her way out of the laundry room and lost her four bottom teeth in the process. I'm too afraid to keep her in there anymore. The repairs were easy enough but we obviously couldn't repair those teeth and who knows what she'll injure in the future. All this to say I made a tilt out trash cabinet so our dog couldn't get to the trash anymore.


I didn't get any pictures before this point because this was a rush job. I used leftover bead board and scrap wood so this project only cost me about six dollars in wood and hinges.


I made these labels because we have a split trash can where we live, half is trash and half is recycling so we have two trash cans to keep things separate and when people come over they always had to ask which was which. Now it's clear to everyone which side they should use. I also chose the shape and gold color to match the hutch we already have in the dining room. This shape is the same as the detail on the hutch doors.


The hutch that I refinished a few years ago. I added gold cup pulls on the drawers after this picture was taken.

I had these knobs from an old dresser that I recently moved to my son's room. I changed the knobs because a few were missing and he wouldn't be able to get the drawers open without them.


I bought brass screws to replace the previous ones and add some more gold to the piece.


The finished piece. It came out way bigger than I imagined and even though I made it to fit our existing trash cans, they were just barely to tall for the doors to open all the way, making it very hard to take the trash out. So I bought two new slightly smaller cans and now it works great.


The only problem is it makes our nook/booth style dining table, which was always a little too small anyway, look cramped in the corner. I think it's time for a new table. The question is do I find one on craigslist and refinish it to match or do I try turning four matching legs and build one myself?


Monday, April 11, 2016

Old Lathe

We were given an old lathe from my husband's boss's father-in-law. I guess he is a realtor and they were helping a widow move. Her late husband had this lathe sitting in a shed for quite some time. The first thing I did was to plug it in real quick just to see if the motor ran. It surprisingly turned on. My dad came and looked at it real quick and his opinion was that it was worth the effort to get it running. I found old wasps nests all over this thing, which didn't even come off when I did the quick motor test.


here's a wasp nest on the end of the pulley you use to adjust the speed


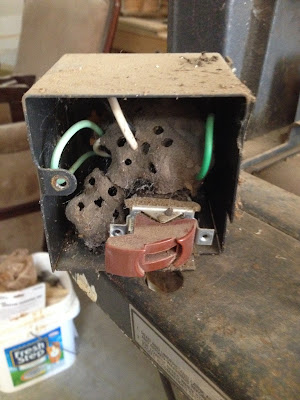
wasp nests inside the switch box, I found a new switch online that wasn't expensive so I decided to not even mess with this one as the red switch part was broken anyway.


super rusty lathe


I made a little part to adjust the tool rest so we wouldn't have to use a wrench each time


I remounted the lathe on a new sort of table top made of plywood and 2x4's.  I also had to make the pipe that the tail stock slides on smooth again. The motor was taken to my dad because some smoke had come out of it. We discovered another wasp nest inside preventing part of the motor from working properly. I'm still surprised it ran at all. He helped me get it back to as good of shape as we could and it was ready to try out.


 I made a quick tool rest (still hoping the original one is found) and my husband tried it out first because I didn't have a face mask yet and wasn't brave enough to try it myself.


this is after one session of turning, my husband doing most of the work.


 the next day I finished it off and turned it into a candle stick holder


It was a lot of fun and very addicting. I think we'll see a lot of my family members trying this lathe out in the future.


Saturday, April 9, 2016

Double Sided Desk

I was approached by a friend of a client who had seen a piece I made. The piece she saw is one that I have a build video for but still no way of editing such a lot of content. My video editor can only handle a tiny amount so I will have that post and video out as soon as I get some new software.  Anyway she asked if I could make a desk. When I saw the picture of what she wanted, I was hesitant. I knew I could build the desk, I was just afraid my anxiety would rocket with all the work, and deadlines, and such. I decided if the only reason to say no was because I was afraid, then I had to at least draw up some plans and give her a quote. If she was okay with proceeding then, I'd tackle it a day at a time, if not, then at least I tried. She gave me the go ahead and I started in on the project. I'd like to share the photo she sent me but after lots of investigation, I couldn't find who to give credit for the piece or even the photo. It seemed as though it was a custom desk built for a client but I didn't get enough info to comfortably post someone else's work here without credit. I'll just show you the progress photo's in the order I took them and then show you the finished piece.

the start of the leg sections


 frames for the drawer sections


all the pieces of the drawers except the fronts ready to be assembled. I actually had to cut them again to re-size them to fit with the drawer slides.


 starting on the top of the desk


  twenty four drawer slides installed (two per drawer)


twenty four more slides installed for the corresponding drawers


and all forty eight slides taken off to prepare for paint


starting on paint


it's hard to see but here is some of the distressing on the piece


twelve, I mean fourteen drawer fronts drying not sure how two extra got in there, but I'm glad they did because I needed an extra one when another one got badly scratched.


some more distressing on the drawer fronts.


reinstalled all the drawer slides and fit the drawers.


 added the drawer fronts, I waited to put the top on till last so I had easier access to install the drawers and fronts


 top is on but you can see in the next three pictures that the finish isn't very glossy, it also chipped off very easily so it was sanded off and in some places repainted which added an extra two weeks to the project


 here you can see the new finish which was glossier and looked much better


I'm really glad I took on this project. It helped bring back the confidence that I could handle the work load and the rest of daily life at the same time. That being said I'm also really glad it's finished and I'm excited to start working on some projects for myself. I also made a quick video of the piece which is up on YouTube for those that want a better look, which I'll link to here: https://www.youtube.com/watch?v=R9ytgkTNEX4&feature=youtu.be


Wednesday, February 24, 2016

Star Braiding Looms

My son's teacher asked for some star braiding looms to use with the kids. I wasn't sure if it was for the class or something else. I think she said it was a club that uses them with her, but anyway I wasn't sure how many to make so I started with the number of kids in my son's class. She gave me the braiding loom she had and I used that to base the shape on. I wanted to cut circles with my bandsaw but the very last part I hadn't replaced broke so I had to figure out another way. I was thinking on it and wondered if my dad had some large hole saws (I needed about a 3.5 in. circle). He didn't have it but he was able to borrow one from work. I then knew I had some pallet boards made of oak that I was saving and decided to use those on this project because I felt with kids a harder wood would last longer. I then went about cutting out 22 circles. Thankfully my sister's father-in-law gave me his old drill press because even on the same rpm's my little drill press couldn't hack it. The bigger drill press sliced through the oak much easier.

Here you can see the hole saw and the circle it cuts.


One batch of circles. I used a forstner bit on the middle hole after cutting the circles because the hole needed to be a little larger.


Sorry this picture is blurry but I traced the pattern of the star from the one my son's teacher gave me and luckily I had the perfect sized hole saw to cut the scallops around the edges. I lined up the marks, clamped it down, and cut. Then I did the same around the whole circle.


Here are some of the circles on the left, then the star shape in the middle, and the darker star on the right is the one I was given to copy. All that was left was to cut the slits. This is where I wish I really had the bandsaw because it's saw kerf is larger making the finished looms easier to use but I ended up using the scrollsaw to cut the slits. Then I used my handsaw to make the slits wider but they would be better if the slits were even a bit wider.


There was a bunch of sanding to do and then I finished them with some shellac spray, which I like to use for anything kids will use as it's a natural but tough finish. I'm shooting for making about 37 more so that there will be two class sets of these. I absolutely love my son's school and I don't get to volunteer in person like I'd like to so this is my little way of helping out. 


Saturday, February 6, 2016

Nothing To Do With Woodworking

I've got a few projects in the works but in an attempt to reduce my screen time, I picked up a project I had abandoned a while ago.  I wanted to improve upon something my sister made for her daughter (now daughters). I asked if I could take a frame that she put what I think is wrapping paper in that was hanging up in her daughter's room. I took it home printed out a verse and went to put it on the wrapping paper. I guess it just seemed like a lot of work so I put it in my craft closet for another day. It has to be at least a year since I touched this project but I finally got it done.

 I think it's really important for girls to have high self esteem. In my opinion it's the most important thing. If a girl has high self esteem she'll always make good choices, maybe not always the right ones, but she'll have the confidence to make the choices that are best for her. So, I chose 1 Peter 3:3-4. "It is not fancy hair, gold jewelry, or fine clothes that should make you beautiful. No, your beauty should come from within you-the beauty of a gentle and quiet spirit. This will never disappear, and it is worth very much to God." Not that my nieces aren't beautiful, far from it, but I'm hoping they will see this everyday and remember how much they are worth when it's needed.

Here's where I picked up on the project. I taped the paper to the table. I had previously cut the words into strips and I just needed to tape them together to fit on the paper. I put carbon paper under the words and I also taped a paper hinge on the top in case I needed to check my progress, I could lift the whole thing up and it would go back in the right place. Then came the hard part, tracing every letter. I did a line a time, sometimes a word at a time because my hand could only take that much. Over the course of two days I finished copying everything.


This is Scabbers respecting my work.


I then took a sharpie and filled in the words which was much faster and easier on my hand since I didn't have to use much pressure.


Here I put it back in the frame it came in ready to hang up.