I have a new project coming up (you're gonna love it) and in order to build it to the best of my abilities I needed a few shop improvements. The first item I made was a zero clearance insert plate for the table saw. The insert that came with the saw has a gap around the area where the saw blade protrudes. Usually this works just fine but for smaller pieces this means the piece can fall through that gap, dangerously get stuck, or have little support under it as it passes over the gap. The first picture shows the insert that came with the blade and the next two are the zero clearance insert that I made.


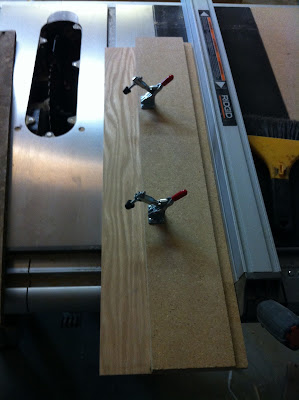
I also needed a jointer. For those who don't know, a jointer flattens the edges of a boards so that they can be edge glued together and not have any gaps. If one edge of a board isn't exactly flat, when you run it through the table saw against the fence any bumps or gaps translate from the fence to the side being cut and you'll end up with the same wavy edge on both sides. Jointers can cost hundreds of dollars up to the thousands of dollars and if something for the shop costs more than five bucks, I'm not in a position to buy it. So I made a jointer jig. One side of the jig has a perfectly flat edge (that's the side that runs along the fence) and I can then put a board in this jig and clamp it in place. The flat edge of the jig will give the edge of board running through the saw a flat edge.
The jig. I wanted bigger clamps but ordered the wrong size. They work for now.
Board clamped into the jig. The right side of the board may look straight but it's not
After running the board through the saw.
When one edge is flat and straight I can take it out of the jig and run that side along the fence so the other side is flat, straight, and parallel to the first side.
Last but not least I needed a router table. When I bought my table saw a big part of the value of the saw was the empty section of table that can be filled with any sort of addition you like. I knew I was going to turn mine into a router table so I could use the table saw fence as part of the router table fence.
Here you can see the table saw with the router addition on the right hand side.
A close up of the router table addition.
This is the router table fence I built with adjustable front. It has a 4" hose flange on top so I can hook it up to a dust collector once I get one.
Here you can see the awesome fence clamps from Rockler that enable the router fence to attach to the table saw fence, keeping it square and firmly in place.
A close up of the adjustable front of the fence.
Here you can see the knobs that allow the front of the fence to slide allowing support as close as you can get to bits of all sizes.


