Friday, September 11, 2015

Rocking Chair Re-do

My sister got this rocking chair at a yard sale for two bucks.


Some kind of small animal had chewed on it and it was pretty wobbly, not to mention the horribly dated paint job. It needed a new life. The existing paint was sound so I could have just painted over it but the turned parts were weirdly rippled. I think it may have been handmade due to the ripples, odd joinery, and some asymmetry in the chair.  I sanded most of  it to be smoother to the touch and look a bit better and filled in some of the bite marks with Spackle. I also filled the joints with glue to stabilize it a bit, but due to nails I couldn't add dowels through the joints like I wanted to make it super stable. It sat like that for awhile until I needed to spray paint a part of another project I'm currently working on, so I figured I'd finish the chair while I was at it.  I sprayed it with the paint my sister gave me. 


Now it's a bit less wobbly and a whole lot prettier. The color is more of a buttery white but it didn't show up well in the photo. This chair is headed for the little heinie of my youngest niece.

Wednesday, September 2, 2015

Shop Improvements

I have a new project coming up (you're gonna love it) and in order to build it to the best of my abilities I needed a few shop improvements. The first item I made was a zero clearance insert plate for the table saw. The insert that came with the saw has a gap around the area where the saw blade protrudes. Usually this works just fine but for smaller pieces this means the piece can fall through that gap, dangerously get stuck, or have little support under it as it passes over the gap. The first picture shows the insert that came with the blade and the next two are the zero clearance insert that I made.


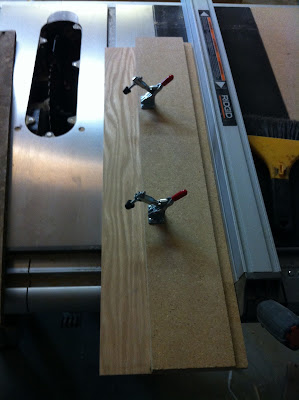
I also needed a jointer. For those who don't know, a jointer flattens the edges of a boards so that they can be edge glued together and not have any gaps. If one edge of a board isn't exactly flat, when you run it through the table saw against the fence any bumps or gaps translate from the fence to the side being cut and you'll end up with the same wavy edge on both sides. Jointers can cost hundreds of dollars up to the thousands of dollars and if something for the shop costs more than five bucks, I'm not in a position to buy it. So I made a jointer jig. One side of the jig has a perfectly flat edge (that's the side that runs along the fence) and I can then put a board in this jig and clamp it in place. The flat edge of the jig will give the edge of board running through the saw a flat edge.

The jig. I wanted bigger clamps but ordered the wrong size. They work for now.


Board clamped into the jig. The right side of the board may look straight but it's not

 After running the board through the saw.

 When one edge is flat and straight I can take it out of the jig and run that side along the fence so the other side is flat, straight, and parallel to the first side.


Last but not least I needed a router table. When I bought my table saw a big part of the value of the saw was the empty section of table that can be filled with any sort of addition you like. I knew I was going to turn mine into a router table so I could use the table saw fence as part of the router table fence. 

Here you can see the table saw with the router addition on the right hand side.

 A close up of the router table addition.

 This is the router table fence I built with adjustable front. It has a 4" hose flange on top so I can hook it up to a dust collector once I get one.

 Here you can see the awesome fence clamps from Rockler that enable the router fence to attach to the table saw fence, keeping it square and firmly in place.

 A close up of the adjustable front of the fence.

 Here you can see the knobs that allow the front of the fence to slide allowing support as close as you can get to bits of all sizes. 


Sunday, August 30, 2015

My Two Cents

I thought I'd give a little advice for any weekend warriors out there, or anyone who doesn't frequent the home improvement stores as much as I do, but still builds things once in a while. Sometimes these big stores can be a little intimidating, especially to people like me who have social anxiety and shopping anywhere is a big ordeal. I do end up in Lowe's or Home Depot a lot though, do to the nature of what I do. I have a Lowe's, Home Depot, and OSH all within five minutes of my home. 

First off just let me start by saying, don't ask the employees for help finding something unless you're looking for a well known item and you don't want to search the whole store. Mostly, in my case though, they have no idea what the item is that I'm asking about. I then have to order it from Amazon, Rockler, or Woodcraft (I wish I had a Rockler or Woodcraft nearby).  But whatever you do, don't ask the employees for advice. Usually they won't have any knowledge in the first place and on a lot of occasions when they don't know what they are talking about they'll advise you anyway. This results in you buying something that you later find out won't work for your project. I've never actually bought the wrong thing from their advice because I knew it was wrong but I've heard more than once from somebody where they did end up at home to find they'd have to return the product. If they approach you, proceed as Ron Swanson would.


That being said, here's the good stuff. If you are buying dimensional lumber such as 2x4's or 1x6's go to Lowe's. They generally have a better selection and better price. At my Lowe's they also line up their big lumber carts in the lumber section so it's really easy to grab one without having to push the awkward things from outside and all through the store. I recently just got some nice and straight pine there with some pretty nice figuring on it, which is weird for pine in the first place.


If you need plywood or paint then Home Depot is your choice. For some reason they have a better selection of plywood .They also carry Purebond formaldehyde free plywood. At my Home Depot you have to hunt down a cart before you enter so keep that in mind. As far as paint goes I've used both Valspar from Lowe's and Behr from Home Depot. For walls I always get paint with primer added, it's a must in my opinion as it covers better, saving time and money. Behr paint however, is my paint of choice. It covers well and matches a lot of builder grade colors that may already be in your home. Valspar covers okay but the sheen of the paint is a bit off. Semi gloss is a bit too flat and it continues through the sheens so you have to buy the next sheen up to get your desired results if that makes sense.

For either store when you are buying lumber head to the checkout in the lumber section. It's wide open so you never have to worry about your lumber hitting anyone and makes it easy to maneuver the cart, especially with large loads. You can also move your car to the loading area and go out the big doors making your experience even easier. Although, I've never move to the loading section because I can usually find a parking spot right outside the lumber area doors. If you need your plywood cut down, it's a lot easier to have them do it in the store. They usually say they charge after 2 cuts. I've never had to pay for extra cuts but I haven't gone over 4 cuts either. The cuts are usually pretty accurate but cutting it a little oversized is always a good idea. Once the plywood is cut I can usually fit it in my Honda Element and don't have to worry about someone helping me tie it to the roof rack. And just for good measure I'll say cut one more time.

For the rest of the items at these stores, It all seems pretty comparable to me. I've saved money on different things at each store over the other so you just have to do your research on most everything else. I don't go to OSH much just because it's a bit small and the chances of getting what I want are better at a bigger store. That being said though I do check out OSH if I can't find what I want at the other two and I was able to get what I need a few times. My OSH is also right next to Harbor Freight and In N Out, two places I love, so I'll stop in if I'm there in the first place. I hope someone finds this useful and let me know if you have any info you would think I should hear.

Thursday, August 20, 2015

Frame

My husband brought home three paintings from his mission trip to Thailand. He brought them back in tubes so he asked me to frame them. One of the paintings was meant for his grandma and I chose to work on that one first as I haven't made anything for her yet that I can remember. I started by making a frame that the canvas could be stapled to. I just ripped a 2x2 in half then ripped each half again so I had four long pieces. After I had stapled the painting to this frame I realized it was off to the side just a tiny bit (which you can see in the picture) but figured the frame would cover it so it didn't matter. My husband saw it at this point and said that's all he wanted but I already had my mind set on making a frame because: a) I wanted to try my hand at making it and the process seemed interesting, b) I didn't think his grandma would like to hang the painting without a frame, and c) the size of the painting wasn't standard so if she did want to frame it she'd have to have it custom framed which can be expensive.


This went fairly well so I went about making the outside frame. I found one I wanted to try made by Steve Ramsey that used a router which you can see here: Steve Ramsey's picture frame video. I changed the process a little because I didn't have my router table built yet and so for some steps it was just easier to use the table saw. It came out okay but I had quite a bit of trouble with this frame. It would have gone much smoother if this were a smaller frame, but I used 2x4's as my rough stock and cut them to the final dimensions I needed for the picture. My struggle started when I couldn't get the bow out of one of the boards. I noticed it when I was cutting it but didn't even think about how that was going to make it so the frame wouldn't lie flat because I was cutting it up into the four sides of the frame anyway. I only realized I used that piece for one of the long sides after I glued it up. I tried to wet the offending board and clamp it flat over night but I didn't have high hopes for this because the piece down the middle is glued into the frame and so the bow was pretty much glued into place. I'll still give it to my husbands grandma but I don't know how nice it's going to look hanging on the wall. I also found that the white part showing on the painting was still showing a little inside the frame so I took all the staples out and re-stapled it. All in all I learned a lot from the process and also tried out a new to me wood putty by Minwax that matches the stain you are using and I really like the result of it, so the whole thing was a good learning experience.


Thursday, August 13, 2015

Throwback Thursday 4

This throwback is another high school wood shop project. If you've ever taken wood shop in high school and then graduated and had to go back to the small pile of tools that you actually own, you'll probably feel the tug of sadness that comes from thinking back to all the awesome machines and tools you used to have access to. That's how I feel when I write these throwback Thursday posts. I've got a lot more tools than I started with, but that shop, it was amazing. This was a project my grandma asked for. It's a vegetable bin or holder. Her kitchen was decorated in apples so I found some apple knobs for it. I learned a lot making this piece especially the top door because it had complex angles on it the result of which I wasn't too happy with. I also learned that I was barely strong enough to work a biscuit joiner, but I got it done. You can see on the bottom the finish that's been removed from my grandma mopping the floors. I also believe my grandpa put in the two lower drawer hinges and added the wire mesh fronts for me. It now lives at my mom's house who took over the apple theme so it seems to fit in nicely. And for all you OCD people out there avert your eyes now and don't look at that last little knob trying to stand out amongst all the other knobs.


Friday, July 31, 2015

Porch Swing (kind of)

Yes I built a beautiful porch swing... well I built this bird sized porch swing for my mother-in-law. I don't think I've made her anything yet so I wanted to find something. I looked at bird feeders because she always seems to have a bunch at her house and likes feeding them. I remembered Steve Ramsey's porch swing bird feeder that he built and decided on that project. I believe he got the idea from Matt McDowell. I finally got to use some of the oak pallet boards I've been saving which made it pretty sturdy with mostly just glue to hold it together. I didn't do any sanding and tried to keep the burn marks from the table saw on the back of the feeder. I also kept as many weathered edges as I could. I finished it with spray lacquer which is safe for the birds. My mother-in-law is going to attach the chains as I didn't have any and I didn't really know where or how high she'd want to hang it. There's a screen sandwiched on the bottom to keep the seeds as dry as possible which is probably a non issue here in California.


Saturday, July 25, 2015

Minecraft Torch

Cousin Camp 2015 is quickly approaching and it's gonna be Minecraft themed. All the kids and myself are really into Minecraft right now and I knew I had to make some kind of torch since it's in the game and basically a flashlight. I just cut some pieces of 1.5" square wood at 7.5". I painted them to look like torches from the game (which was no easy task since I'm making six). I cut a hole down in the top to fit a small flashlight in then trimmed a quarter inch off the top and replaced it with a quarter inch piece of plywood that has a hole just a little smaller than the flashlight. I screwed the plywood on top to hold the flashlight in and you just push on the flashlight to turn it off and on.